
The first SBG Official Katana
The Torakami and Kuramono
DISCONTINUED
This sword has been discontinued and is no longer in production or available, but is preserved on the site for informational purposes.
The first ever serious designs for an official SBG Katana were the Torakami and the Kuramono Katana.
Before that I had designed a couple of prototype blades for what would later become the SBG Custom Katana series - but those designs were somewhat off the cuff 'let's just see what the forge can do with them' kind of swords..
But these, well these were different.
Already before I had started the design process, the foundation these swords were laid upon had been laid by several people - one of them was one of the SBG stores first customers way back in 2005. And the others were all highly trained Japanese Sword Art Sensei from Canada with degrees ranging from 5th to 7th dan black belt..
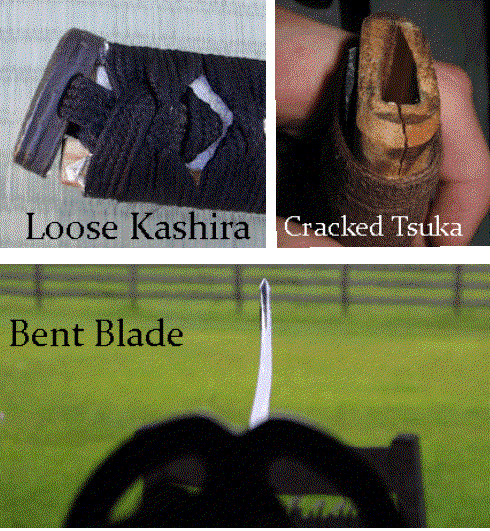
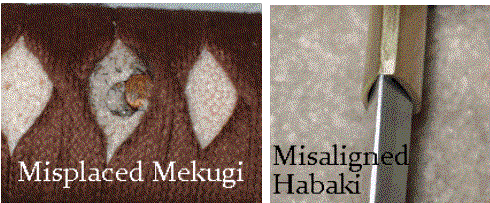
The design had to be more than 'pretty' - my quest had always been to try and address the most common issues encountered with entry level Japanese swords. Things like loose kashira that causes the ito to unravel, cracked tsuka (the industry is still working on that one - a cracked tsuka is not as bad as some people think, but it's endemic), bent or warped blades, badly misaligned habaki, weird menuki - you get the idea..
Now usually, these things do turn up on production level swords from time to time (some brands more than others). A lot of it had to do with price, i.e. to bring a hand made sword in at under $300 retail (especially ones with a real hamon) requires that 'near enough is good enough' is the mantra of choice.
I set out to change all that..
In hindsight, a lofty and naive wish perhaps - the project encountered numerous setbacks after I signed off on it and by 2012, they exist in name and reputation only.
But I think we did at least help to raise the bar just that little bit higher than where it was set before. And the swords I created with this end in mind, well - I'll let this review and testing overview speak for itself..
Pro Sword Prototypes Review
(The Torakami and Kuramono)
Review and Prototype testing by SBG Editor in Chief, Paul Southren
The backstory about how these swords came to be has been explained already on the SBG Swords page - but in a nutshell it all started in 2008 when one of the SBG sword stores first customers, a Canadian gentleman named Paul Mumby, sent me an email telling me all about how he had found a micro-forge in China that was largely unknown, but had some really skilled smiths who were VERY serious about producing high end blades, but that their work ethic carried across to their entry level ones too..
Up to this point, Paul had spent around one year helping this forge to make their already good products EXCEPTIONAL by sending prototypes to a group of independent top ranking iaido sensei (ranging from 5th to 7th Dan) for critique and feedback. And over the course of the year, using this feedback to continually improve the swords until they met their strict requirements: every detail of these swords were heavily scrutinized by this group of sensei to eliminate the typical issues that plague most production swords.
Well, naturally, I was more than a little intrigued!
So I ordered my own prototype: a basic 1060 monotempered blade with iron and brass fittings. And apart from the pseudo hamon, which I did not like at all, this was one of the most comfortable to weild, well assembled and great handling blades that I had laid my hands upon!
Sure it wasn't a $1,000+ Bugei. But it was essentially '100% issue free'. And to be honest - the differences between this sword and those two or three times the price were actually pretty small...
Below is a pic of this prototype:

I was VERY happy with this sword. But there was just one element missing for me personally. I did not want to change the dynamics or basic build of the sword (which had already been perfected by the team of Canadian Sensei, who the heck am I to argue with them!). But what I really wanted was differentially hardened blade with a real hamon.
And cool fittings wouldn't go astray either..
It took another 6+ months of going back and forth to create a couple of designs that were (selfishly I'll admit) designed to MY specs. And another couple of months to really try them out and ensure that I was 100% happy with them. But the project to create the perfect entry level Katana had taken on a life of its own, and with a few VERY interesting options added along the way, the final result was two 'perfected' designs...! My OWN swords that met my requirements, that I could recommend to anyone who wanted just ONE sword that would last time a lifetime: a carefully pre-inspected, martial arts grade sword at a fraction of the normal price you'd pay for this kind of reliabiliy...
The flagship design is the Kuramono ('dark thing'), MY sword - made to suit my own personal tastes!
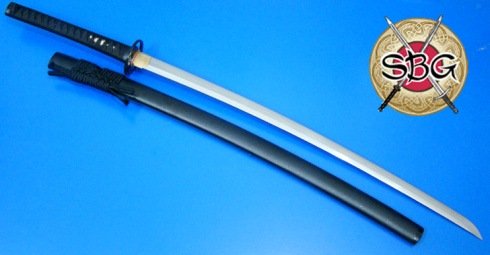
And the other is one of the limited edition 'bling blades' - the first one being a more attractive and ornate model called the Torakami ('Tiger Spirit').
So let's take a closer look..
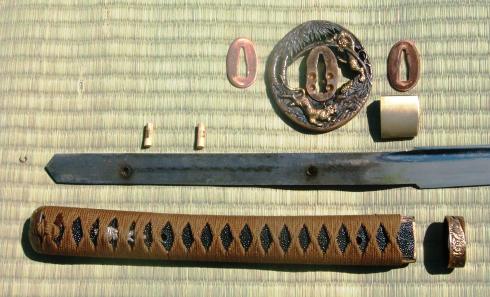
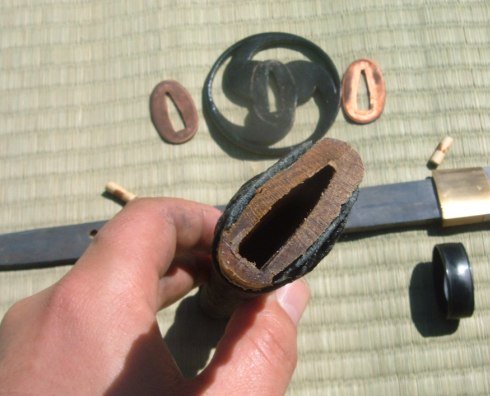
The Koshirae (fittings)
Now as mentioned, one of the biggest problem with relatively low priced, entry level Katana is the fittings - and many people resort to building their own as a result (which not only costs time, but often quite a lot of money). But with the Official SBG Katana range - I wanted to make sure that the fittings received as much attention as the blade, because - quite frankly - you can have the best blade in the world, but if the fittings are crap - so is the sword...
With this in mind, let's take a look at the two official SBG Professional Grade Katana's Koshirae, starting with the most attractive of the two, the limited edition Torakami.
Torakami Fittings
The Torakami's fittings are high quality hardened copper with, as the name suggests, a Tiger theme. This set is not unique in itself, it's commercially available and a copy of a Japanese antique, but the combination really popped in my minds eye when I was designing it - and looked even better when I saw it in real life up close and personal..
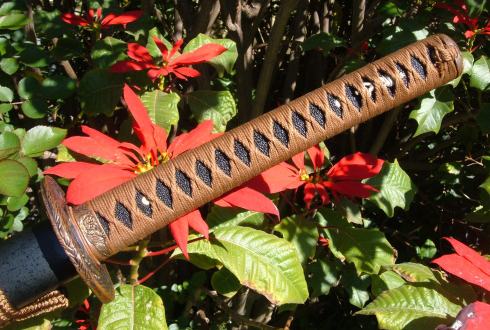
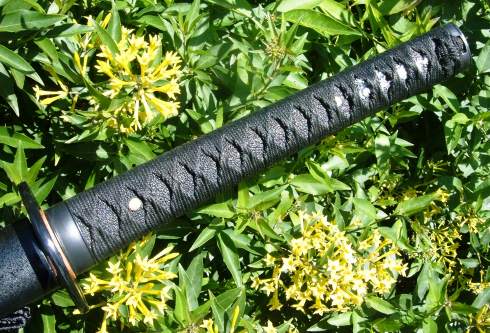
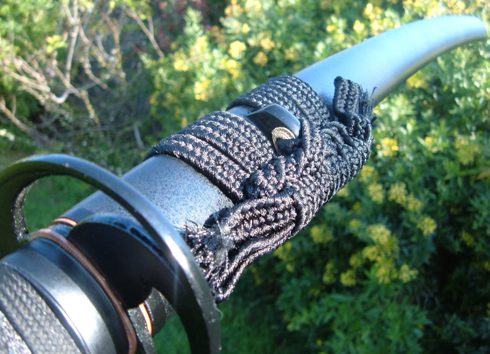
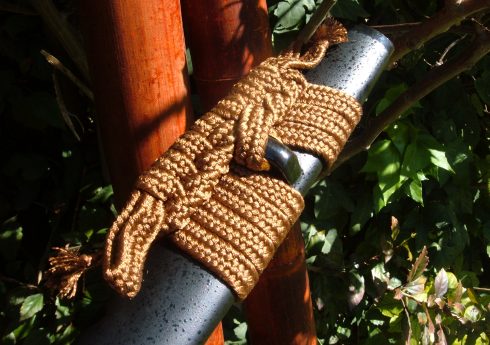
Above is a picture of the hilt. Note the tsuka wrapped with brown premium grade synthetic silk ito (we chose the premium grade synthetic silk ito because it is more affordable than real silk, but most importantly more durable and STRONGER. Otherwise, side by side, it is virtually indistinguishable and could easily be passed off as the real thing!).
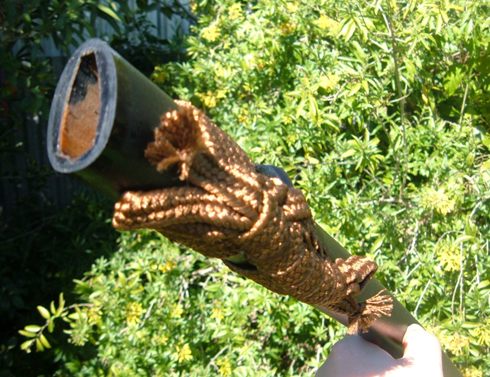
We also used the same synth-silk (though thicker) on the Sageo as it does not stretch and is very (very) strong, allowing it to be tied on to the obi securely in a dojo setting.
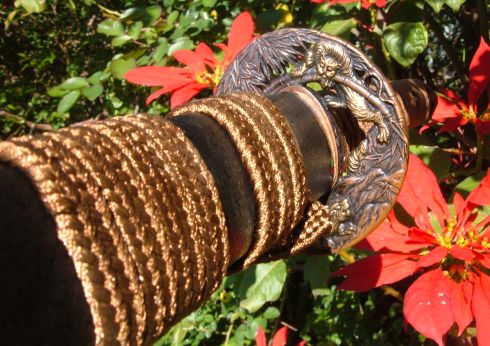
The tsuba is both tough and yet extremely attractive, depicting two tigers stalking their prey in a bamboo jungle setting. The photos simply do not do it justice, it looks so much better in real life!
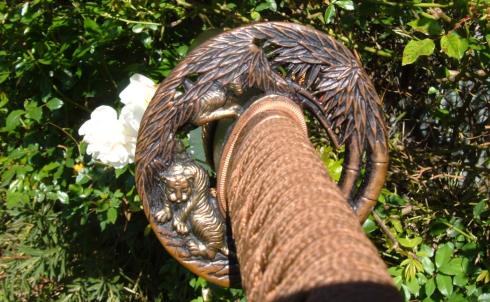
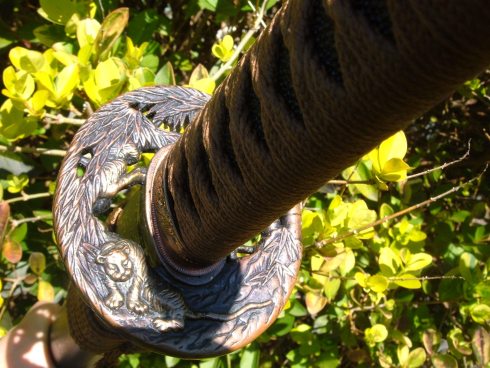
Moving down from the tsuba, we find the Tiger theme continues onto the Fuchi, which is perfectly form fitted to the tsuka
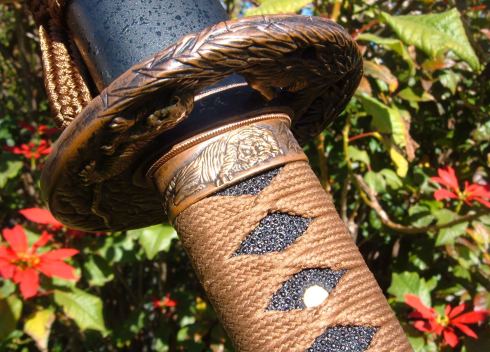
The ito wrap is EXTREMELY tight and quite hard to budge when trying to shift it the side to tap out the pegs. Purists will note that it is wrapped in the CORRECT alternating style - not the usual shortcut method...
The combination of using a tough wearing ito, tightly and correctly bound on the tsuka has seen previous prototypes using this configuration last indefinitely without having had the need to re-wrap them, even when used several times a week in a dojo setting over two years!
In other words, the ito wrap is build to last...! ;-)
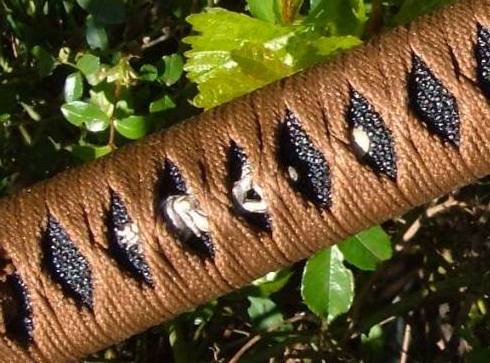
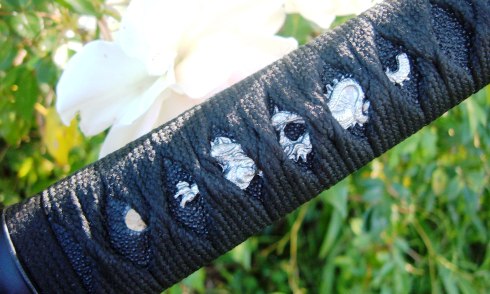
Above you can see the uniform quality of the black rayskin - and while they are strips instead of a full wrap to keep the price down, they are one CONTINUOS piece of true quality rayskin with decent sized nodules, not the usual leftovers and scraps... It is a bit hard to see, but you may also be able to make out the golden Tiger Menuki ornament.
Finally, we come to the Kashira - which naturally enough
is also of a Tiger.It really looks like it is poised to jump out at you doesn't it?
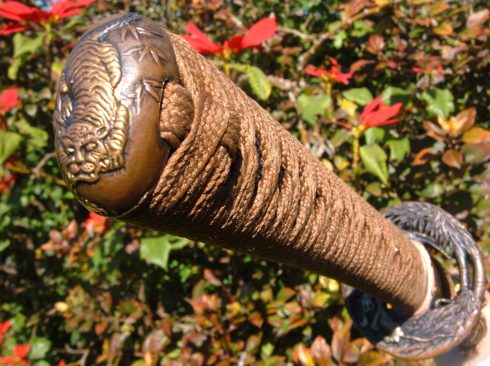
Naturally enough, the Kashira is also very firmly attached and does not budge.
Indeed, the whole assembly is actually very carefully put together which is very apparent when disassembling this Katana.
The tsuka is carefully friction fitted to the nakago (tang) and all components are individually tailored to fit together instead of taking a one size fits all approach, resulting in zero jiggling, rattling or the need for shimming. Indeed, even the habaki comes off and is perfectly seated and centered in the middle of the blade as it should be (so often they are severely misaligned).
Being custom fitted to the tang, the tsuka integrity is preserved - and it is also made from high quality, cured wood to prevent cracking or shrinking in transit.
So far so good - indeed quite exceptional. Though bear in mind there was no way we could get this particular piece under $300.. The Tiger fittings alone cost around $70.. This would be the 'showpiece' - the other - plainer, slightly less expensive and meaner looking...
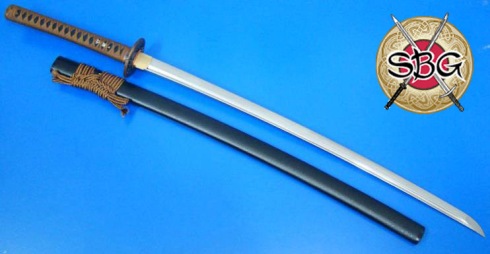
The Kuramono
I actually designed this sword to reflect my own personal taste in a Katana: simple, functional and MEAN looking. And when I first laid eyes upon my completed design, I knew I had achieved my intended goal.
Kuramono means 'dark thing' - and with black same, black syth-silk ito, black fittings and saya - I think it is a very suitable name...!
The ONLY bit of color in the Kuramono's fittings is the silvered dragon menuki (which is not silver of course, but rather a silver colored alloy).
The choice of tsuba for this sword was quite easy for me. Out of the many components available to the forge, it was a black "Mitsugahsira Hidari Tomoe" (left rotating triple commas) style tsuba that jumped out at me - made of solid iron instead of the usual alloys for added durability.
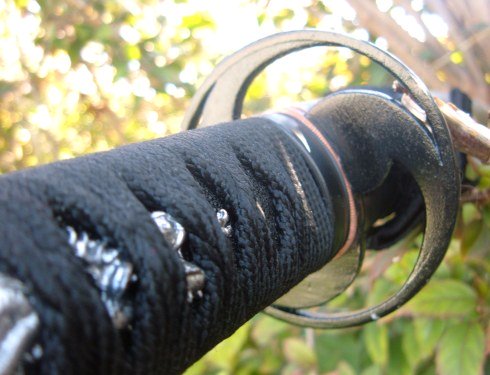
Finally, the sword is set off at both ends with unadorned black Fuchi and Kashira. Both Fuchi and Kashira are actually made of powder coated brass - I actually wanted iron, but we could not get it - however at least this was better than aluminum alloy like many entry level Katana (this is very important for the overall structural integrity of the handle).

Like the Torakami, all components are very carefully assembled to ensure a perfect fit, with no looseness, rattling or any other issues. And as you can see below, the tsuka is perfectly intact, with a great friction fit for the last couple of inches, and the same brass seppa used in the Torakami instead of those awful 'gear cog' seppa used on almost every other production sword.
Essentially, the main difference between the Torakami and the Kuramono is that the fittings of the Torakami are considerably more ornate, while the Kuramono is simpler looking and uses iron (tsuba) and brass (fuchi/kashira) - but is certainly no less functional (though there is also a difference in the blade, which I will get to very soon in the review, but first - a quick look at the saya of both these swords).
The Saya
The saya of both the Torakami and the Kuramono are essentially the same, apart from the color of the sageo (the Kuramono's saya is pictured above and the Torakami below)
Both have a nice 'textured' finish to minimize scratching and fingerprints (I'm such a klutz that within 5 mins of getting a new sword, I have usually banged the saya on something, and wiping off fingerprints is a serious pain. So I wanted a very sturdy and utilitarian finish for these saya).
Again, like the rest of these swords components, the saya and the sword fit together beautifully. Not too tight, not too loose - and with virtually NO saya rattle (another very common cosmetic issue, though not a big deal in the grand scheme of things).
A fitting home indeed for the blade, speaking of which...
The Blades
The blades of the official SBG Katana are both made from T10 tool steel, mostly because I fell in love with this steel when making the earlier SBG Custom Katana as it is very strong, scratch resistant and does not dull easily.
Both the Torakami and the Kuramono both have straight as an arrow blades (a VERY important part of the QC process) that are 2.45 shaku long (29" from the Muromachi; the notch at the back of the habaki/blade collar) and both are differentially hardened with a REAL unetched, unenhanced natural hamon that is a world apart from all other hamon in this price range...
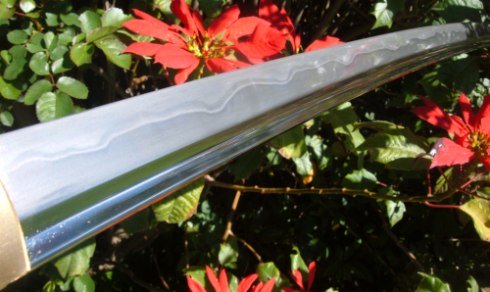
The hamon on these blades is actually quite striking and visible from just about every angle. It may not 'pop' as much as some others, but it's evenness was impressive.
The hamon is not only prominent, but also very consistent - staying away from the edge and as you can see below, extends right to the tip of the kissaki - called 'Boshi' (sorry about the dirt on the kissaki, I should have cleaned it properly before taking the photo!).
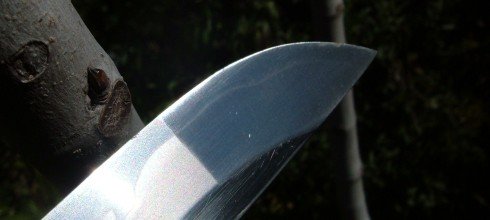
The kissaki was, as with almost EVERY production level sword not quite as evenly polished as the rest of the blade - and it did not have a true geometric yokote (something we only recently achieved with the SBG Custom Katana, but bear in mind that these prototypes were made a few years before we managed to achieve this with the custom line).
Essentially, there are two main differences between the blades of the Torakami and the Kuramono. The first one is that the Torakami has a bo-hi (fuller) and the Kuramono does not. This was carefully calculated to get optimum performance from both blades based on the weight and distribution of their fittings, and as we will see when we get to their handling and performance in a moment, was right on the money.
But the other difference is the level of sharpness.
The Kuramono is subjected to a 10 step sharpening process, with each step referring to how the blade is sharpened from coarse to increasingly fine polishing stones until it is paper cutting sharp.
However, the Torakami and other limited edition blades to follow have been subjected to a much higher end 12 step sharpening process, an additional two levels of sharpeness that go above and beyond any other sword in this price range.
Time to put them to the test..
Testing
Naturally, before being completely satisfied with the official SBG Katana, it was extremely important to subject both blades to rigorous test cutting practices: both to ensure that the blades were up to par on the most common 'backyard cutting' and martial arts grade targets, but also that the fittings would hold up to prolonged and frequent usage without showing any signs of fatigue or damage.
Both swords cut the standard targets such as tatami mats, bamboo and water filled P.E.T. bottles out of the box without a problem.
VIDEO: Standard Cutting Tests
Not surprisingly, it passed the basic tests with flying colors
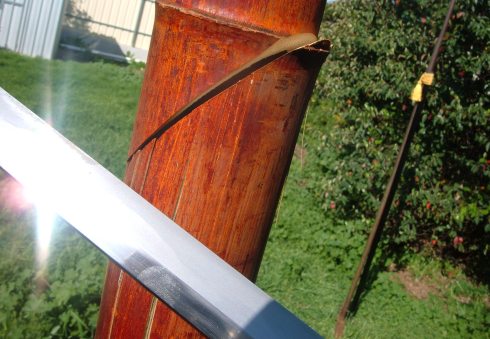
Having completed tests on all normal targets, I picked out some very thick, and very dry hardened bamboo for what amounts to an abusive blade test.
Now usually, thick bamboo like this is only cut when it is FRESH. And it certainly proved very hard to cut all the way through in one go (mostly likely because my technique is crap). Indeed, my first attempted cut felt like it barely did anything at all, until I looked at the bamboo and was rather shocked at how deep the cut really was...
DISCLAIMER
(Don't Try This At Home!)
Destructive tests of this manner are NOT recommended as standard test cutting exercises. These tests were conducted after careful examination of the swords structure and blade geometry to determine probable breaking points. Historical swords were designed primarily to cut human flesh and bone, with a little extra to deal with secondary unintended targets like shields, armor, etc. Breakages in battle were commonplace and if you attempt to recreate these tests, no manufacturer in their right mind would cover you for damages!
But more surprised than the depth of the cut was I to find that the blade itself was practically unscathed!
Naturally enough though, when it comes to putting my name to a new product, I REALLY want to ensure that it goes above and beyond the call of duty. And while this test was definitely considered to be abusive, I had to step it up several levels to really know the steel and its limitations before I was comfortable putting the SBG stamp of approval on it...
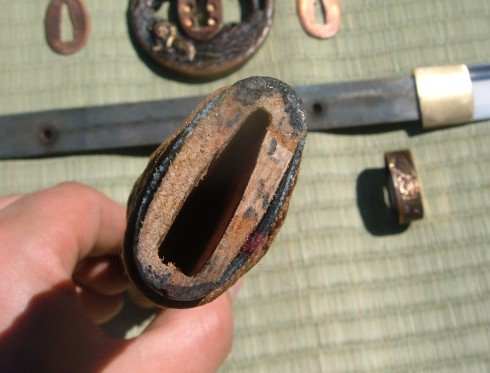
Unbeknownst to the forge, I had a third blade made for destructive testing purposes, with the same fittings as the Kuramono but the blade of the Torakami. In other words, a blade that would represent the weakest points of both swords combined into one.
"My goal here was to subject the blade to as much abuse as possible to break it open and have a look at the steel inside..!"
So for my target, I selected something that was guaranteed to cause maximum damage: two steel poles back to back and fixed into the ground so they would not give, with one side having a smooth surface and the other a raised star shaped 0.3" 'sword breaker' edge of hardened steel guaranteed to cause maximum damage to ANY blade (sure, I could have tested them on bricks, steel drums, etc as usual - but I've been there, done that - and just wanted to cut right to the heart of it and bust one in half!).
Several full force blows were sent smashing into the side of the smooth, rounded steel, biting deep into the target.
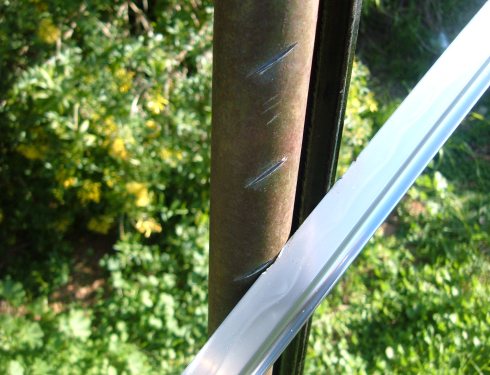
Examination of the blade revealed only minor edge deformation that could have been polished out if so desired, while many other swords in this price range would have already either chipped, bent horribly or broken by this point.
But polishing the damage out was not an option, after all - I had donned heavy and hot armor for this test and really wanted to see a cross section of this blade. So I moved to the otherside, and proceeded to hit what is easily the most damaging target I have ever subjected a blade to...
Several full force blows directly to the edge did indeed cause quite a bit of damage, chipping away into the hardened edge of the hamon, but this is what was SUPPOSED to happen: the integrity of the blade itself remained, and if this was a sword fight, I could have kept on going...
Knowing that the weakest point of a Katana was its side, I proceeded to smash it against the concentrated edge of the steel target, but it only broke when two strikes were made in rapid succession (no doubt the blade was still vibrating from the first blow when it hit again, and it proved to be all too much for it)...
VIDEO: Breaking the Sword
Smashing it against the edge of the steel stake did the trick.. But not straight away
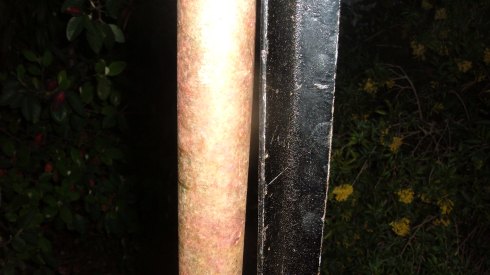
While I was sad for the sword, overall I was very happy - because not only was it hard to break, but now I could finally look inside at a cross section of the steel itself.
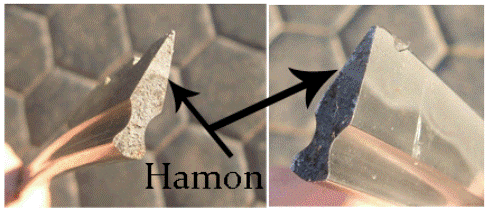
As you can clearly see, the grain of the steel was extremely consistent, and the martensite of the hamon line clearly separated from the milder steel body.
In short, this sword was structurally sound, with a very strong blade that under normal test cutting circumstances would be virtually unbreakable (though NOTHING could survive the test I subjected it to).
With this test, and having tested them on normal targets, looked
carefully under the hood and inside the steel itself - I was
satisfied..! The project was off to a good start!
Where are they now...?
These tests were completed in 2009, and by 2010 SBG had handed the project over to Paul Mumby who was poised to take it to the next level..
But sadly, despite the best of intentions, things just did not pan out that way..
The business changed hands soon afterwards because despite strong demand for the product and many happy customers, there were massive production delays, break downs in customer service and by the end of 2012, the original forge that was making them disappeared..
For the time being, the designs have passed into obscurity - though inferior knockoffs are still being produced to this day that are EXACT copies of its design in terms of appearance, but far removed in terms of performance and overall quality.
But stay tuned, a new and improved version is being worked on behind the scenes - and we will provide details here as soon as possible after all the details are worked out..
I hope this review of the Official SBG Katana has been helpful. To return to A Beginners Guide to Authentic Japanese Swords from the First Official SBG Katana, click here
Buying Swords Online Can Be DANGEROUS!
Find the Best Swords in the:

Popular & Recommended ARTICLES


VISIT OUR SPONSORS:


