Recent Articles
-
Christmas Sword Buying Guide 2025
Dec 03, 25 10:53 PM
Learning from the Ladies - Part 2
by Peter
(Adelaide, Australia)
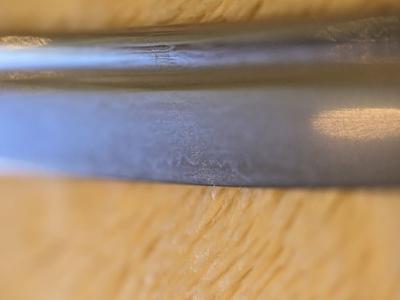
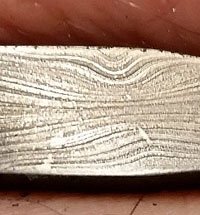
Closeup of the blade
In my last post (“Learning from the ladies” under the sword sharpening guide section of this site) I wrote of my experiments in blade sharpening using non-traditional techniques. I left that post at the point where I had completed sharpening the sword (a folded steel “Damascus” type blade from China) but was yet to etch the blade to re-establish the folded steel pattern which was lost during my sharpening efforts. That is what this post is about. I will also write about an experiment I conducted in creating a chemical false “hamon”. Although this follow-up post is not so much about the sharpening aspect it naturally follows that part of the project so people may find it to be useful in that context.
At the end of my sharpening and repolishing of the newly sharpened blade it had a high polished sheen, as having started with 600 grit, I eventually did move on (partly out of curiosity) to use 1200 then even 1500 grit even though I had intended not to do so. The problem with this is that a high polish shows the slightest scratch and of course the nice folded steel pattern (or “hada” in Japanese) was now invisible.
I had read in many posts here and elsewhere that bringing out the steel pattern could be achieved with a variety of etchants. At one end of the scale, normal household white vinegar is an option. At the other end of the scale, a strong acid like ferric chloride was commonly used. I decided to start with the vinegar option to see how this works on the basis that if it does not work well then I could always go stronger. First a word of advice. White vinegar can be found very cheaply at the super market but brands are more dilute than others. You may need to experiment to find one that is more concentrated. It will be worth it. Even so the necessary etch is unlikely to be achieved with one or even two etch cycles. You will need to go through several at least as I describe below. So set aside a half a day or so for the task. It is not quick to do properly. At least not in my experience.
Here is a description of the basic etching cycle. First demount the blade and using surgical spirits, acetone or similar, clean and degrease it thoroughly and carefully. It is useful at this point to wear rubber gloves and to have some kind of jig that allows you to suspend the blade in such a manner that the newly etched portion does not touch anything while it is undergoing etching. As I was doing this in my kitchen (wife is away or I would have been relegated to the garage) I simply up-ended the stainless steel dish draining rack. By placing the nakago of the blade in the metal rack the blade itself could be held stably and made to point upwards at an angle of about 45 degrees. Perfect.
You might find it useful to boil a kettle full of clean water and also, using a small glass or similar bowl, take some vinegar and place it in the microwave oven for 30 seconds to one minute. A hot blade (this is what the boiling water is for) and hot etchant speeds the process up somewhat and might save several etch cycles. At this point it is also useful to note that placing a small drop of dish washing liquid in the vinegar is useful as it helps the vinegar to spread evenly on the metal without pooling which results in uneven application. But do not use too much either – this causes foaming which will result in bubbles and will similarly produce uneven application of the etchant. When the liquids are good and hot, hold the blade over the sink and pour half the boiling water over it. Then with a clean rag wipe the hot vinegar over the blade. (You may wish to use some kind of tongs to hold the cloth saturated with very hot fluid unless your fingers are made from asbestos). I rubbed fairly vigorously. Continue doing this for several minutes, pouring more hot water on the blade from time to time if you feel it necessary. You will begin to see the blade discolour and go grey then ultimately a dark grey. Oxides are developing on the surface of the metal. Leave the blade in the holding jig to sit for several minutes till the metal is more or less dry. The metal can often now be quite dark (not always – it depends on the vinegar’s strength). Incidentally if you are of a mind to, you can also speed up the process in another way. Buy a bottle of hydrogen peroxide from the pharmacy. This is an oxidant. Adding a little to your vinegar before wiping the blade will speed the oxidation process. BTW hydrogen peroxide like any oxidant can be dangerous so be careful about adding it to any other chemicals to catalyse them unless you know what you are doing. I had no bad effects from using it but this is all at your own risk.
Now is the time to “card” off the oxide build up on the blade. This is necessary as the grey oxide prevents further application of the etchant from working on the steel. I tried using fine (1200 grit) emery paper but found even this too aggressive as it removes all the oxide and repolishes the blade which is not what you want. What you want is for the etchant to attack the softer steel more, so that the difference between the soft and hard steel layers becomes apparent and the polishing must leave this intact. I came to prefer a fine metal polish paste. I ended up using a product bought from auto parts store which has a fine metal polish (smells like “brasso”) embedded in cotton wadding. After doing this, again degrease the blade carefully and repeat the etching process as described above. Do this as many times as needed, which can be as many as six, eight of ten times. Like I said, set aside half a day, it is not a fast process with each etching cycle taking perhaps 20 minutes or more. When finished and you are satisfied with the results, you will need to make sure all remnants of acid are neutralised and cleaned from the blade. This can be done using bicarb of soda or some people use “Windex”. Both seem to work. Dry and oil the blade.
As I have not tried the ferric chloride option yet I cannot comment on how well this works. I should imagine this would be much quicker and that one or two cycles might suffice. All articles I have read about it stress the importance though, of diluting the agent for use as it is far too strong as it comes. Remember you do not want the entire blade etched – only the softer portions, so a really strong etchant is not needed and can damage your blade.
Now I mentioned above in my introduction, my experiment with a false “hamon”. When I started the etching process I was worried that this would undo the sharpening I had so carefully just completed so I decided to use a “stop” painted along the sharp edge of the blade to prevent the etchant from attacking the newly sharpened edge. Once more I raided her ladyship’s cupboard and found some nail polish. Then it occurred to me, that by extending the “stop” back to about a centimetre from the edge there would be a clear difference between the etched and un-etched portions of the blade. So, I painted the nail polish along the edge of the blade in a ragged pattern as an experiment to see if it could roughly approximate the look of a real hamon, reasoning that if I did not like it I could always polish it out. I then repeated 3-4 etch cycles before removing the nail polish using acetone. The effect at this stage was far too strong but never the less bore a faint resemblance to a hamon. The difference between the un etched edge portion of the blade and the etched rest of the blade was clear with a satin effect above and shiny steel below. But I have to say it would fool no one although it certainly looked better than the wire etched false “hamons” on some cheap blades. Rather than polishing it out immediately (although this is an option) I decided on another experiment. I then partially polished along the line of the “hamon” using 600 grit emery to substantially soften the appearance of the line between the two areas. Then I proceeded with a further three or four etch cycles over the entire blade including the area that was previously “stopped”. This resulted in a much fainter false hamon which is still visible when the light is right but nowhere near as obvious as before. Better but still not perfect not even necessarily very good. But good enough that for now I will not bother polishing the blade and starting again. I mention this experiment here as some people may find it instructive and useful to give it a go.
A couple of photos have been posted at the links below. The first shows a close up of the blade. The second link shows an over view of the sword (on the left) that I worked on together with another project that I have started with its still incomplete tsuka awaiting application of same and tsukaito. That sword has a real clay hardening hamon so will not need me to play around with my experiments. I for one would be interested in hearing how other people fare if they decide to repeat this experiment for themselves. It occurs to me that better results might be had with better techniques although for my part this really was just an experiment driven by my curiosity and I do not know that I would rush to repeat it. Good luck. Happy etching.
Photo links:
http://i122.photobucket.com/albums/o251/peterm1_bucket/P1010716.jpg
http://i122.photobucket.com/albums/o251/peterm1_bucket/P1010715.jpg

Buying Swords Online Can Be DANGEROUS!
Find the Best Swords in the:
Popular & Recommended ARTICLES

The ONLY true free online magazine for sword enthusiasts. Delivered once a month on the 1st day of the month, no filler and no BS, just the latest sword news & info delivered straight to your inbox.


